https://github.com/lnjky/fashion_people
GitHub - lnjky/fashion_people: 패션 추천 어플
패션 추천 어플. Contribute to lnjky/fashion_people development by creating an account on GitHub.
github.com
코드 전체를 보려면 위에 링크를 통해 확인할 수 있습니다.
게시글을 작성하는 방법에 대해 작성해보려 한다.
우선 이 글을 읽기 전 리사이클러뷰가 있어야 하고 파이어스토어를 연결해줘야 한다.
[안드로이드] 리사이클러뷰 만들기
https://github.com/lnjky/fashion_people GitHub - lnjky/fashion_people: 패션 추천 어플 패션 추천 어플. Contribute to lnjky/fashion_people development by creating an account on GitHub. github.com 코드 전체를 보려면 위에 링크를 통해
loasd.tistory.com
게시글을 작성하기 위해서 일단 제목, 내용을 받아와야 한다.
Edit Text를 만들어주고 저장 버튼을 만들어준다.
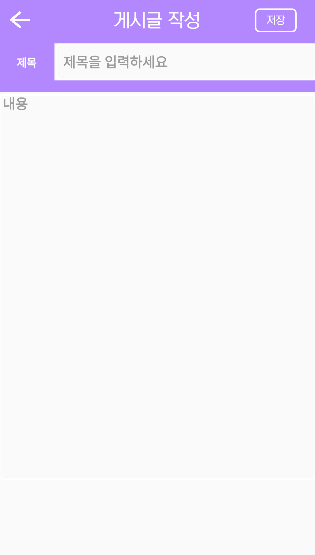
이런 모습이 나오게 XML을 만들어준다.
XML 아래와 같이 작성하였다.
<?xml version="1.0" encoding="utf-8"?>
<androidx.constraintlayout.widget.ConstraintLayout xmlns:android="http://schemas.android.com/apk/res/android"
    xmlns:app="http://schemas.android.com/apk/res-auto"
    xmlns:tools="http://schemas.android.com/tools"
    android:layout_width="match_parent"
    android:layout_height="match_parent"
    tools:context=".PostActivity">

    <include
        android:id="@+id/toolbar"
        layout="@layout/toolbar">

    </include>

    <ImageView
        android:id="@+id/iv_back"
        android:layout_width="40dp"
        android:layout_height="33dp"
        android:background="@drawable/ic_baseline_arrow_back_24"
        app:layout_constraintBottom_toBottomOf="@+id/toolbar"
        app:layout_constraintEnd_toStartOf="@+id/tv_post_title"
        app:layout_constraintHorizontal_bias="0.064"
        app:layout_constraintStart_toStartOf="parent"
        app:layout_constraintTop_toTopOf="@+id/toolbar"
        app:layout_constraintVertical_bias="0.481">

    </ImageView>

    <TextView
        android:id="@+id/tv_post_title"
        android:layout_width="wrap_content"
        android:layout_height="wrap_content"
        android:fontFamily="@font/koreanah1_r"
        android:text="게시글 작성"
        android:textColor="@color/white"
        android:textSize="25dp"
        app:layout_constraintBottom_toBottomOf="@+id/toolbar"
        app:layout_constraintEnd_toEndOf="parent"
        app:layout_constraintHorizontal_bias="0.498"
        app:layout_constraintStart_toStartOf="parent"
        app:layout_constraintTop_toTopOf="@+id/toolbar" />

    <Button
        android:id="@+id/btn_post"
        android:layout_width="54dp"
        android:layout_height="31dp"
        android:background="@drawable/edit_bg"
        android:fontFamily="@font/koreanah1_r"
        android:text="저장"
        android:textColor="@color/white"
        app:layout_constraintBottom_toBottomOf="@+id/toolbar"
        app:layout_constraintEnd_toEndOf="@+id/toolbar"
        app:layout_constraintHorizontal_bias="0.74"
        app:layout_constraintStart_toEndOf="@+id/tv_post_title"
        app:layout_constraintTop_toTopOf="@+id/toolbar" />

    <TextView
        android:layout_width="72dp"
        android:layout_height="50dp"
        android:background="#B388FF"
        android:gravity="center"
        android:text="제목"
        android:textColor="@color/white"
        android:textStyle="bold"
        app:layout_constraintBottom_toBottomOf="@+id/et_post_title"
        app:layout_constraintEnd_toStartOf="@+id/et_post_title"
        app:layout_constraintHorizontal_bias="0.0"
        app:layout_constraintStart_toStartOf="parent"
        app:layout_constraintTop_toTopOf="@+id/et_post_title"
        app:layout_constraintVertical_bias="0.0">

    </TextView>

    <EditText
        android:id="@+id/et_post_title"
        android:layout_width="338dp"
        android:layout_height="48dp"
        android:background="@drawable/edit_bg"
        android:hint=" 제목을 입력하세요"
        android:padding="5dp"
        android:textColor="@color/black"
        android:textStyle="bold"
        app:layout_constraintEnd_toEndOf="parent"
        app:layout_constraintHorizontal_bias="1.0"
        app:layout_constraintStart_toStartOf="parent"
        app:layout_constraintTop_toBottomOf="@+id/toolbar">

    </EditText>

    <ImageView
        android:id="@+id/bar"
        android:layout_width="match_parent"
        android:layout_height="15dp"
        android:background="#B388FF"
        app:layout_constraintBottom_toTopOf="@+id/et_post_contents"
        app:layout_constraintTop_toBottomOf="@+id/et_post_title"
        app:layout_constraintVertical_bias="0.0"
        tools:layout_editor_absoluteX="0dp">

    </ImageView>

    <EditText
        android:id="@+id/et_post_contents"
        android:layout_width="match_parent"
        android:layout_height="500dp"
        android:background="@drawable/edit_bg"
        android:hint=" 내용"
        android:textColor="@color/black"
        android:textSize="18sp"
        android:textStyle="bold"
        android:gravity="left"
        app:layout_constraintBottom_toBottomOf="parent"
        app:layout_constraintEnd_toEndOf="parent"
        app:layout_constraintHorizontal_bias="0.0"
        app:layout_constraintStart_toStartOf="parent"
        app:layout_constraintTop_toBottomOf="@+id/et_post_title"
        app:layout_constraintVertical_bias="0.147">

    </EditText>
</androidx.constraintlayout.widget.ConstraintLayout>
이렇게 XML을 작성하고 이제 코드를 작성해주면 된다.
다들 알겠지만 Edit Text를 통해 입력받은 제목, 내용을 저장버튼을 눌렀을 시 파이어스토어에 저장하게 해주면 된다.
그렇게 하기 위해 우선 현재 사용자의 정보를 가져와야 하기 때문에 아래의 코드를 작성해 주었다.
이는 파이어스토어에 저장된 데이터를 불러오는 기능을 하며 아래의 링크에서도 한번 소개한 적이 있다.
구체적인 내용은 아래의 링크를 통해서 확인하길 바란다.
[안드로이드] 파이어스토어의 데이터 가져오기
https://github.com/lnjky/fashion_people GitHub - lnjky/fashion_people: 패션 추천 어플 패션 추천 어플. Contribute to lnjky/fashion_people development by creating an account on GitHub. github.com 코드 전체를 보려면 위에 링크를 통해
loasd.tistory.com
여기서 사용한 코드이다.
        if (mAuth.getCurrentUser() != null) {
            mStore.collection(FirebaseID.user).document(mAuth.getCurrentUser().getUid())
                    .get()
                    .addOnCompleteListener(new OnCompleteListener<DocumentSnapshot>() {
                        @Override
                        public void onComplete(@NonNull Task<DocumentSnapshot> task) {
                            if(task.isSuccessful()) {
                                DocumentSnapshot document = task.getResult();
                                if(document.exists()) {
                                    Log.d("TAG","Document is exists");
                                    nickname = (String) document.getData().get(FirebaseID.nickname);
                                    documentId = (String) document.getData().get(FirebaseID.documentId);
                                }
                                else
                                    Log.d("TAG","Document is not exists");
                            }
                        }
                    });
        }
이렇게 작성해서 현재 사용자의 닉네임과 documentID를 가져온다.
그리고 저장버튼의 OnClickListener를 작성해준다.
    //버튼 클릭시
    @Override
    public void onClick(View view) {
        if(mAuth.getCurrentUser() != null) {
            // 겹쳐도 상관없게 하는 구문
            String postID = mStore.collection(FirebaseID.post).document().getId();
            Map<String, Object> data = new HashMap<>();
            data.put(FirebaseID.documentId, mAuth.getCurrentUser().getUid());
            data.put(FirebaseID.title , et_title.getText().toString());
            data.put(FirebaseID.nickname, nickname);
            data.put(FirebaseID.contents , et_contents.getText().toString());
            data.put(FirebaseID.timestamp, current_time);
            data.put(FirebaseID.time, FieldValue.serverTimestamp());
            data.put(FirebaseID.collectionId, postID);
            mStore.collection(FirebaseID.post).document(postID).set(data, SetOptions.merge());
            finish();
        }
    }
Map을 만들어서 EditText로 입력된 String을 파이어스토어에 저장해준다.
각각 title, contents에 입력된 값이 저장될 것이다.
mStore.collection(FirebaseID.post).document(postID).set(data, SetOptions.merge());경로는 이렇게 설정해주었다.
postID의 경우 상단에 String으로 선언해준 것을 볼 수 있다.
이렇게 하고 저장버튼을 누르면 finish();가 되어 액티비티가 종료되고 최근 열었던 액티비티로 전환된다.
패플의 경우 Board Fragment로 화면이 전환된다고 보면 된다.
아래는 저장된 모습을 보여준다.

title에 제목, contents에 내용이 들어가 있는 것을 확인할 수 있다.
time의 경우 리사이클러뷰에 정렬될 때 최근것이 가장 위로 올라오게끔 하기 위해 넣었고
timestamp는 java의 현재시간을 가져오는 기능을 통해 작성한 시간을 보여주도록 하였다.
[안드로이드] SimpleDateFormat
https://github.com/lnjky/fashion_people GitHub - lnjky/fashion_people: 패션 추천 어플 패션 추천 어플. Contribute to lnjky/fashion_people development by creating an account on GitHub. github.com 코드 전체를 보려면 위에 링크를 통해
loasd.tistory.com
내용이 길어져 작성한 글을 리사이클러뷰를 통해 불러오는 내용은 다음 글에서 소개하도록 하겠다.
[안드로이드] 작성글 리사이클러뷰로 불러오기
https://github.com/lnjky/fashion_people GitHub - lnjky/fashion_people: 패션 추천 어플 패션 추천 어플. Contribute to lnjky/fashion_people development by creating an account on GitHub. github.com 코드 전체를 보려면 위에 링크를 통해
loasd.tistory.com
'안드로이드' 카테고리의 다른 글
| [안드로이드] 별점 추가하기 ( XML ) (0) | 2023.01.05 |
|---|---|
| [안드로이드] 작성글 리사이클러뷰로 불러오기 (0) | 2023.01.05 |
| [안드로이드] 파이어스토어의 데이터 가져오기 (0) | 2023.01.05 |
| [안드로이드] 플로팅 버튼 ( 게시글 작성 버튼 ) (0) | 2023.01.04 |
| [안드로이드] 리사이클러뷰 간격 조정 (0) | 2023.01.04 |