https://github.com/lnjky/fashion_people
GitHub - lnjky/fashion_people: 패션 추천 어플
패션 추천 어플. Contribute to lnjky/fashion_people development by creating an account on GitHub.
github.com
코드 전체를 보려면 위에 링크를 통해 확인할 수 있습니다.
[안드로이드] 기상청 단기예보 API 사용하기 - 1
https://github.com/lnjky/fashion_people GitHub - lnjky/fashion_people: 패션 추천 어플 패션 추천 어플. Contribute to lnjky/fashion_people development by creating an account on GitHub. github.com 코드 전체를 보려면 위에 링크를 통해
loasd.tistory.com
공공데이터 포털에서 기상청 API를 승인받은것 까지 했다.
그러면 이제 데이터를 받아오는 작업을 해줘야 한다.

여기서 상세설명을 눌러보면 새 창이 뜨는데 맨 아래 보면 샘플 코드가 있다.
나는 안드로이드에서 JAVA를 사용했기 때문에 JAVA 코드를 보면 이렇다.
/* Java 1.8 샘플 코드 */


import java.io.InputStreamReader;
import java.net.HttpURLConnection;
import java.net.URL;
import java.net.URLEncoder;
import java.io.BufferedReader;
import java.io.IOException;

public class ApiExplorer {
    public static void main(String[] args) throws IOException {
        StringBuilder urlBuilder = new StringBuilder("http://apis.data.go.kr/1360000/VilageFcstInfoService_2.0/getUltraSrtNcst"); /*URL*/
        urlBuilder.append("?" + URLEncoder.encode("serviceKey","UTF-8") + "=서비스키"); /*Service Key*/
        urlBuilder.append("&" + URLEncoder.encode("pageNo","UTF-8") + "=" + URLEncoder.encode("1", "UTF-8")); /*페이지번호*/
        urlBuilder.append("&" + URLEncoder.encode("numOfRows","UTF-8") + "=" + URLEncoder.encode("1000", "UTF-8")); /*한 페이지 결과 수*/
        urlBuilder.append("&" + URLEncoder.encode("dataType","UTF-8") + "=" + URLEncoder.encode("XML", "UTF-8")); /*요청자료형식(XML/JSON) Default: XML*/
        urlBuilder.append("&" + URLEncoder.encode("base_date","UTF-8") + "=" + URLEncoder.encode("20210628", "UTF-8")); /*‘21년 6월 28일 발표*/
        urlBuilder.append("&" + URLEncoder.encode("base_time","UTF-8") + "=" + URLEncoder.encode("0600", "UTF-8")); /*06시 발표(정시단위) */
        urlBuilder.append("&" + URLEncoder.encode("nx","UTF-8") + "=" + URLEncoder.encode("55", "UTF-8")); /*예보지점의 X 좌표값*/
        urlBuilder.append("&" + URLEncoder.encode("ny","UTF-8") + "=" + URLEncoder.encode("127", "UTF-8")); /*예보지점의 Y 좌표값*/
        URL url = new URL(urlBuilder.toString());
        HttpURLConnection conn = (HttpURLConnection) url.openConnection();
        conn.setRequestMethod("GET");
        conn.setRequestProperty("Content-type", "application/json");
        System.out.println("Response code: " + conn.getResponseCode());
        BufferedReader rd;
        if(conn.getResponseCode() >= 200 && conn.getResponseCode() <= 300) {
            rd = new BufferedReader(new InputStreamReader(conn.getInputStream()));
        } else {
            rd = new BufferedReader(new InputStreamReader(conn.getErrorStream()));
        }
        StringBuilder sb = new StringBuilder();
        String line;
        while ((line = rd.readLine()) != null) {
            sb.append(line);
        }
        rd.close();
        conn.disconnect();
        System.out.println(sb.toString());
    }
}
이 코드를 조금 손봐서 안드로이드 스튜디오에 적용해보려 한다.
우선 JAVA 클래스 파일을 새로 생성해준다.
GitHub 링크의 코드는 Utility 폴더 안에 WeatherData 파일이 있다.
그리고 사용하기 좋기 살짝 수정해준다.
public class WeatherData {

    private String sky, temperature, wind, rain, snow, humidity;

    public String lookUpWeather(String date, String time, String nx, String ny) throws IOException, JSONException {
        String baseDate = date; // 2022xxxx 형식을 사용해야 함
        String baseTime = timeChange(time); // 0500 형식을 사용해야 함
        String type = "json";

        // end point 주소값
        String apiUrl = "http://apis.data.go.kr/1360000/VilageFcstInfoService_2.0/getVilageFcst";
        // 일반 인증키
        String serviceKey = "일반 인증키";

        StringBuilder urlBuilder = new StringBuilder(apiUrl);
        urlBuilder.append("?" + URLEncoder.encode("ServiceKey", "UTF-8") + "=" + serviceKey); // 서비스 키
        urlBuilder.append("&" + URLEncoder.encode("nx", "UTF-8") + "=" + URLEncoder.encode(nx, "UTF-8")); // x좌표
        urlBuilder.append("&" + URLEncoder.encode("ny", "UTF-8") + "=" + URLEncoder.encode(ny, "UTF-8")); // y좌표
        urlBuilder.append("&" + URLEncoder.encode("numOfRows","UTF-8") + "=" + URLEncoder.encode("14", "UTF-8")); /*한 페이지 결과 수*/
        urlBuilder.append("&" + URLEncoder.encode("base_date", "UTF-8") + "=" + URLEncoder.encode(baseDate, "UTF-8")); /* 조회하고싶은 날짜*/
        urlBuilder.append("&" + URLEncoder.encode("base_time", "UTF-8") + "=" + URLEncoder.encode(baseTime, "UTF-8")); /* 조회하고싶은 시간 AM 02시부터 3시간 단위 */
        urlBuilder.append("&" + URLEncoder.encode("dataType", "UTF-8") + "=" + URLEncoder.encode(type, "UTF-8"));    /* 타입 */

        /*
         * GET방식으로 전송해서 파라미터 받아오기
         */
        URL url = new URL(urlBuilder.toString());
        // json데이터들을 웹페이지를통해 확인할 수 있게  로그캣에 링크 출력
        System.out.println("url : " + url);
        HttpURLConnection conn = (HttpURLConnection) url.openConnection();
        conn.setRequestMethod("GET");
        conn.setRequestProperty("Content-type", "application/json");

        BufferedReader rd;
        if (conn.getResponseCode() >= 200 && conn.getResponseCode() <= 300) {
            rd = new BufferedReader(new InputStreamReader(conn.getInputStream()));
        } else {
            rd = new BufferedReader(new InputStreamReader(conn.getErrorStream()));
        }
        StringBuilder sb = new StringBuilder();
        String line;
        while ((line = rd.readLine()) != null) {
            sb.append(line);
        }
        rd.close();
        conn.disconnect();
        String result = sb.toString();
serviceKey에 일반인증키(Encoding)을 넣어주고 apiUrl에 워드파일에 있던 링크를 넣어준다.
StringBuilder urlBuilder = new StringBuilder(apiUrl);
urlBuilder.append("?" + URLEncoder.encode("ServiceKey", "UTF-8") + "=" + serviceKey);
urlBuilder.append("&" + URLEncoder.encode("nx", "UTF-8") + "=" + URLEncoder.encode(nx, "UTF-8"));
urlBuilder.append("&" + URLEncoder.encode("ny", "UTF-8") + "=" + URLEncoder.encode(ny, "UTF-8"));
urlBuilder.append("&" + URLEncoder.encode("numOfRows","UTF-8") + "=" + URLEncoder.encode("14", "UTF-8"));
urlBuilder.append("&" + URLEncoder.encode("base_date", "UTF-8") + "=" + URLEncoder.encode(baseDate, "UTF-8"));
urlBuilder.append("&" + URLEncoder.encode("base_time", "UTF-8") + "=" + URLEncoder.encode(baseTime, "UTF-8"));
urlBuilder.append("&" + URLEncoder.encode("dataType", "UTF-8") + "=" + URLEncoder.encode(type, "UTF-8"));
여기에는 각각의 형식에 맞게 채워준다.
| 입력 값 | 상세 내용 |
| ServiceKey | 서비스키 |
| nx | X좌표 |
| ny | Y좌표 |
| numOfRows | 한 페이지의 결과 수 |
| base_date | 조회 날짜 |
| base_time | 기준 시간 ( 02:00부터 3시간 간격으로 입력해야 함 ) |
| dataType | 가져올 데이터 타입 ( XML / JSON ) |
base_time은 단기예보가 02:00 기준으로 3시간 간격으로 05:00 / 08:00 이런식으로 입력해줘야 한다.
그래서 시간 기준을 3시간으로 나누기 위해 siwtch - case를 사용하였다.
public String timeChange(String time)
    {
        // 현재 시간에 따라 데이터 시간 설정(3시간 마다 업데이트) //
        switch(time) {

            case "0200":
            case "0300":
            case "0400":
                time = "0200";
                break;
            case "0500":
            case "0600":
            case "0700":
                time = "0500";
                break;
            case "0800":
            case "0900":
            case "1000":
                time = "0800";
                break;
            case "1100":
            case "1200":
            case "1300":
                time = "1100";
                break;
            case "1400":
            case "1500":
            case "1600":
                time = "1400";
                break;
            case "1700":
            case "1800":
            case "1900":
                time = "1700";
                break;
            case "2000":
            case "2100":
            case "2200":
                time = "2000";
                break;
            case "2300":
            case "0000":
            case "0100":
                time = "2300";

        }
        return time;
    }
이렇게 하면 3시간 간격으로 시간을 입력해줄 수 있다.
그리고 JSON 파일형식으로 데이터를 가져왔기 때문에 가져온 데이터를 파싱하면 된다.
	// response 키를 가지고 데이터를 파싱
        JSONObject jsonObj_1 = new JSONObject(result);
        String response = jsonObj_1.getString("response");

        // response 로 부터 body 찾기
        JSONObject jsonObj_2 = new JSONObject(response);
        String body = jsonObj_2.getString("body");

        // body 로 부터 items 찾기
        JSONObject jsonObj_3 = new JSONObject(body);
        String items = jsonObj_3.getString("items");
        Log.i("ITEMS", items);

        // items로 부터 itemlist 를 받기
        JSONObject jsonObj_4 = new JSONObject(items);
        JSONArray jsonArray = jsonObj_4.getJSONArray("item");

        for (int i = 0; i < jsonArray.length(); i++) {
            jsonObj_4 = jsonArray.getJSONObject(i);
            String fcstValue = jsonObj_4.getString("fcstValue");
            String category = jsonObj_4.getString("category");

            if (category.equals("SKY")) {
                if (fcstValue.equals("1")) {
                    sky = "맑음 ";
                    current_weather_code = "1";
                } else if (fcstValue.equals("2")) {
                    sky = "비 ";
                    current_weather_code = "2";
                } else if (fcstValue.equals("3")) {
                    sky = "구름많음 ";
                    current_weather_code = "3";
                } else if (fcstValue.equals("4")) {
                    sky = "흐림 ";
                    current_weather_code = "4";
                }
            }

            if (category.equals("TMP")) {
                temperature = fcstValue + "℃ ";
            }

            if(category.equals("WSD")) {
                wind = fcstValue + "m/s ";
            }

            if(category.equals("POP")) {
                rain = fcstValue + "% ";
            }
            if(category.equals("SNO")) {
                snow = fcstValue + " ";
            }
            if(category.equals("REH")) {
                humidity = fcstValue + "%";
            }

        }

        return sky + rain + temperature + wind + snow + humidity;
이렇게 각각의 변수 sky, rain ,temperature, wind, snow, humidity를 가져오고 리턴해준다.
위의 코드는 예시이기 때문에 if문을 통해 각가의 코드에 맞는 값들을 가져오면 된다.
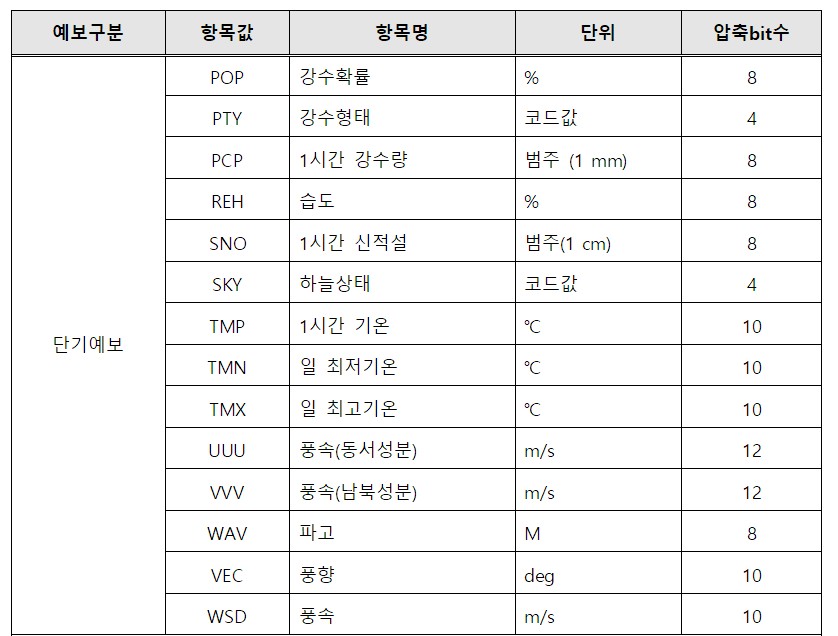
만약 1시간 강수량을 가져온다면
            if (category.equals("PCP")) {
                "변수" = fcstValue + "mm ";
            }
이렇게 코드를 작성해주고 마지막에 return해주면 된다.
이 후에는 Activity에서 메서드에 알맞은 변수를 입력해는 과정을 작성해주면 된다.
[안드로이드] 기상청 단기예보 API 사용하기 - 3
https://github.com/lnjky/fashion_people GitHub - lnjky/fashion_people: 패션 추천 어플 패션 추천 어플. Contribute to lnjky/fashion_people development by creating an account on GitHub. github.com 코드 전체를 보려면 위에 링크를 통해
loasd.tistory.com
'안드로이드' 카테고리의 다른 글
| [안드로이드] Glide 라이브러리 (0) | 2023.01.06 |
|---|---|
| [안드로이드] 기상청 단기예보 API 사용하기 - 3 (3) | 2023.01.06 |
| [안드로이드] 기상청 단기예보 API 사용하기 - 1 (0) | 2023.01.06 |
| [안드로이드] 댓글 작성 만들기 (0) | 2023.01.05 |
| [안드로이드] 별점 추가하기 ( XML ) (0) | 2023.01.05 |